May 14, 2007
Sunday Night Stamping: Mother’s Day Gift
Happy Mothers Day! My mom came out today, we had a great dinner together, but I did yard work rather than finish her gift…I’m a terrible daughter. But she’ll get it tomorrow!
I found out she hasn’t bought new sheet sets for herself in years, so I picked up a flat sheet and a couple of pillowcases from Ikea with this project idea in mind.
First, I washed and dried them- new sheets smell awful coming out of the package.
Then I inked up my friend Jo’s Blossoms Abound set in Pretty in Pink craft ink. I stamped in a simple pattern on both the pillowcases as well as her top sheet.

To stamp the second overlaid image (I love Two-Step Stamping!) I inked up the stamp with Ruby Red craft ink. I did this a lot. Finally I stamped the stem image, then both leaf pieces, in Old Olive craft ink.
This isn’t hard, but I do now have blisters on my thumb, Jo’s stamps are stained (the wood), and I’ve decided to iron them tomorrow. They can air dry overnight.

Aren’t they pretty?
So the steps to stamping on fabric, to re-cap:
1. Prepare your fabric- wash and dry, or iron, as needed (do not use fabric softener or any other additives- I don’t believe it adheres to the fabric correctly)
2. Use Craft Ink only- a pigment based ink. Dye inks (such as Stampin’ Up classic), or Solvent inks (such as Stazon) won’t work!
3. Stamp
4. Let dry. You can speed up the process with a heat gun, but it’s better to leave it alone overnight. Then you can be sure it’s dry.
5. Iron it on the setting for your fabric type (ie. these are cotton) but iron it DRY. No steam!
6. Enjoy!
You should be able to wash these when needed. Over time there will be fading, but the beauty is still there.
May 10, 2007
Loving Hearts Sampler

I made this sampler last year. These are 3×3 cards, but I love how they give 6 great ideas for the one stamp set. I’ve used mostly Pretty in Pink, Real Red, and Close to Cocoa Classic inks; 2 of the cards also use Not Quite Navy. Hope you enjoy these ideas! This stamp set is retired as of June 30, 2007. On May 15, I’m sending out a special free gift card offer to my newsletter subscribers who live in Canada- it’s not too late to sign up for it! Check out my typepad blog and sign up there!
Images © 1990-2007 Stampin’ Up!
May 5, 2007
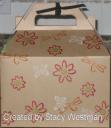
Fresh Flowers Gable Box

Made to wrap my FIL’s bday gift. My son stamped the white butterflies- pretty good eh?
Images © 1990-2007 Stampin’ Up!
May 2, 2007
Technique Tuesday: Candle Stamping
Traditionally, at least since I’ve been a demonstrator, candle stamping involved stamping on tissue paper, then heating the candle using a heat gun and wax paper until the tissue was melted into the stamp. I always found this difficult to really do well, and it seems like once the candle is burned you could run into the problem of lighting your tissue paper on fire. I decided to attempt to stamp directly on the candle. It worked well!
First, collect your supplies:

As you see, I used the Bold Butterfly stamp set and assorted craft inks. Next, hold the candle tightly, and apply stamps in a rolling motion across the surface. If at first you don’t succeed, wipe off the ink with a baby wipe and try again. Continue stamping in this way until you’re happy with the results.
Here’s my finished candle:

And here’s one I made last year for our Christmas dinner:

The only issue when stamping candles in this way is the length of time it takes for the ink to dry. There is only one way to dry craft ink on wax, and that is to wait very patiently. It takes at least 2 weeks, potentially more, so if you try this allow yourself plenty of time to leave it alone. I keep mine up on top of my canisters so they’re out of my son’s reach, but close enough to check on every week or so.
I would love to see some of your stamped candles! Please send me a link in your comments!
Images © 1990-2007 Stampin’ Up!

