December 16, 2008
Glass Glitter Ornaments- Teacher Gifts!

I found the blog, Prairie Paper and Ink, with the most amazing tutorial on how to make these! Check it out here. There are excellent pictures and instructions to follow.
My ornaments- 2 for 1 teacher, 2 for the other- (and one for me) were made using Pale Plum reinker (soft subtles colour family, Stampin’ Up!) and water. The lighter ornaments used the Stampin’ Up! White Chunky Glitter, the darker ones were made by combining all the Stampin’ Up! Fine Cosmo Glitter into one container and using that mixture.
I was so excited, I was cackling. My husband was a little concerned. You MUST try this out!
Enjoy!
November 28, 2008
I’m a bad blogger! And a plea for advice…blog candy to follow!
I know, it’s been too long, yet again. I can’t explain what happened, life just seems to be a lot busier than I thought it would be now that the kid is in school. He’s gotten sick a lot- seems to catch every bug- which then makes my life busy, looking after sick kid, sick husband, sick myself.
Pregnancy is going well, I’m at 21 weeks…I think…most of the morning sickness is gone, but I’m still really exhausted. For a while there I was getting 12-15 hrs. of sleep a day, so you can imagine not much else got done.
Right now I’ve lost my voice completely due to another cold brought home from school. It’s been really lingering because obviously I can’t take medication or anything normal to get rid of it. . I hope by this time next week to be feeling awesome.
I have been stamping and creating, however, so in a nutshell here are some of my fall projects. If you have a favorite or have questions about any one of them in particular, leave me a comment and let me know and I’ll add details.
My http://www.stacywestman.typepad.com will also have some projects and details. Feel free to check out what will be featured over there! I hope to get that done with before the weekend.


As an aside, if any of you have any advice or suggestions on getting organized, staying organized, and keeping on top of housework, please drop me a line. I’m not sure where to start, and once baby comes in the Spring, I can forget about getting organized then. I need to figure it out now 🙂
Any advice is much appreciated, and anyone who gives me some will be entered into a draw to get something. I’m not sure what at the moment…something from Stampin’ Up! for sure, and something that can easily be mailed, so it will definitely be something flat. Everyone is welcome to enter my draw, but you’ll only be entered once, no matter how many pieces of advice you give me.
May 8, 2008
Technique Tuesday: Using Chipboard, Part 2
I know it’s Wednesday, but we had a bit of an emergency in the house last night so I couldn’t do this until today.
Start with a plain piece of chipboard, as before.

Using sandpaper or a sanding block, sand the edges down so all the nubbies are removed. Pick your colour of Craft (pigment) ink. I used Chocolate Chip for my star.
You need to use Pigment ink rather than dye ink as the colour will be more rich and permanent. It’s really important to get good, even coverage and you can’t do that without using a pigment ink.
Pick up your chipboard and swipe your piece against the ink pad. I’m right handed, so I used my left hand to hold the star, and my right hand to swipe the ink pad against the star.

When you’ve got most of the chipboard covered, use your heat gun to dry it. You can tell when it’s dry when the chipboard almost resembles suede.

Holding the now-dried portions of your chipboard, apply ink to the remaining sections, and dry as before.
The edges of your chipboard will still be a regular chipboard (grayish) colour. I used my chocolate chip stampin’ write marker to colour in the edges. Because it isn’t the face of the star I’m not too concerned about the even-ness of my coverage- I just wanted to hide the original chipboard colour.
I’m in the process of making gifts for a special day to celebrate special people. After the event itself I’ll post a picture of my finished project. To add some visual interest to my star I used a white Rub-On star from Stampin’ Up! It really adds to my star, don’t you think?

Other uses for Chipboard include ornaments for a Christmas tree, special keepsake gift tags for a pretty paper gift bag, wrapped present, or other gift, keepsakes for wedding guests, decorative garland, hanging mobiles, picture frames, scrapbook page embellishments, etc. If you’ve done something with chipboard please email me a sample picture, so I can post it here and give you some credit!
Have a great week!
Stacy
April 20, 2008
Edmonton Womens Show- Free Class Projects
Congrats to my winners from the EWS last weekend. Here’s a picture of some of the projects you get at your free class (a $15 value!)
If you haven’t already replied to my phone call, please get back to me as soon as possible! I look forward to hearing from you.
Stacy Westman
April 2, 2008
Technique Tuesday: Using Chipboard

The first time I bought chipboard from Stampin’ Up! I left it in my cupboard for close to half a year. I confided in my friend Chantel (visit her blog here) that I didn’t know what to do with it. She gave me a one-on-one tutorial that rocked my world . Using chipboard is now one of my most favorite of techniques. Tonight I’ll show you how to decorate it with Designer Series Paper, and next month we’ll use a different technique.
Start with chipboard shapes. For this demonstration I used assorted loose pieces from On Board Blossoms and Basics. I love this set of chipboard from Stampin’ Up! You can use the whole flowers, or mix and match petals to get the effect you are looking for.
I don’t have step-by-step pictures of how to cover it, but I’ll describe it in great detail 🙂
First, punch out the chipboard. Don’t worry about the little nubs that are left on your piece- you’ll sand them off later.
Next, use an adhesive (My preferred one for this technique is Anywhere Glue Stick from Stampin’ Up!) to completely cover your chipboard. Don’t be stingy with the glue- you want your piece to be completely covered.
Once it’s covered in glue, place it glue side down onto your preferred piece of designer series paper. Make sure you “smoosh” it down well to remove any air bubbles that might have formed. Allow it to “set” for just a minute, then take a sharp pair of scissors or a hobby knife and cut it out of the paper, as close as possible to the edge.
The next step is where you pull out sanding blocks or sanding paper and sand down the edges. Designer Series Paper has a white core, so when you do this with that particular kind of paper you get a pleasing white edge on the paper. I feel it finishes the look quite nicely.
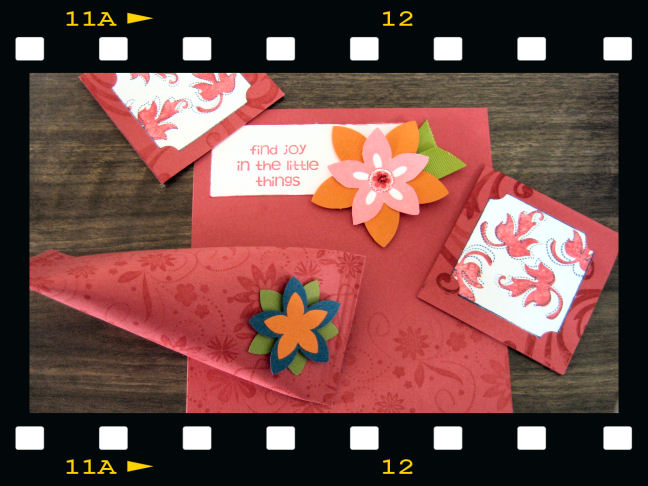
This project was done at one of my last club meetings. We made scrapbook pages that are sized 5×7 so they can go into a picture frame and onto the wall. This one was for a club member who couldn’t make it. We used River Rock Cardstock with Bali Breeze Designer Series paper. A gel pen was also used to draw dots around the project. A stamp from “Time Well Spent” was used for the page title.

My frame is already on the wall. I love how it turned out.We used Purely Pomegranite cardstock, with Pumpkin Pie and Soft Sky mats for the photo, again used Bali Breeze Designer Series Paper for the chipboard petals.
I hope you’ve enjoyed this tutorial! If you’re afraid of taking your chipboard out please take some of these ideas and play. It’s so much easier than I thought it would be, and I love the dimension it adds to your projects.
Until next time,
Stacy Westman
April 1, 2008
Loonies for Littles
</a href=’https://stamperstacy.files.wordpress.com/2008/04/closed-loonies.jpg’ title=’closed-loonies.jpg’>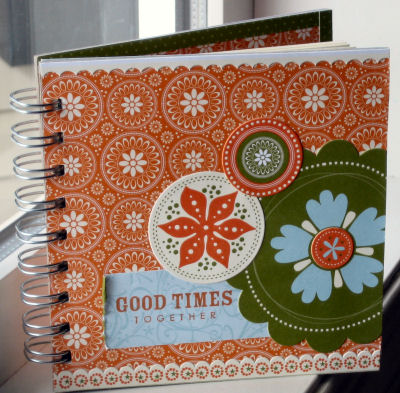
I’m posting a picture here of the newest Canadian Promotion, Loonies for Littles. This stamping kit contains everything you need to make an adorable little scrapbook- stamps, ink, designer series paper, self-adhesive diecuts (cardstock weight stickers), cardstock, and a 5×5 “on board” journal. The only thing it lacks is adhesive. I used Tombow Mono Multi-Purpose Adhesive.
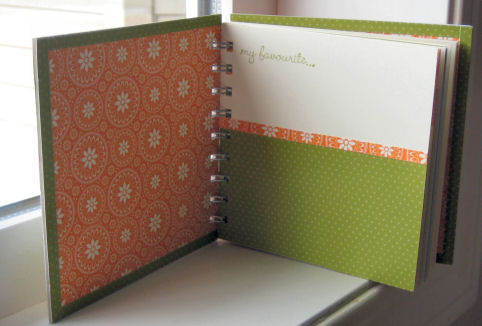
This is my mini book. I’m so good at giving brag books and pictures etc. to everyone else, but seem not to make them for myself. This little booklet has blank pages for now, but after the Edmonton Women’s Show (April 12-13) I’ll be putting pictures of our little family in here, and it will be my book to keep and cherish.
Have a good week!
March 23, 2008
Carousel Notes Birthday Scrapbook
I can’t believe how long it’s been since I’ve blogged anything of stamping interest- I apologize.
Back to life!
My dad’s bday is coming up, and what better gift than a little themed scrapbook of his only grandchild? I’ve been really enjoying stamping projects for myself, thinking a bit outside the box. I also made one of these for my mom’s Easter gift, but will post that later on- we’re off to dinner. That will probably end up on my Typepad blog.
Start with the NEW Carousel Notes from the Occasions Mini. I love this little Mini! Everything in it is just so cute. These big scalloped circle pieces were something I just had to have.
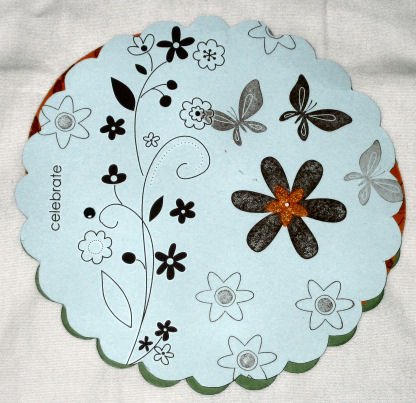
I have to admit I’m a bit of a miser. I traced the Wasabi scallop circle with my Versamarker onto Soft Sky, than cut that out to make the cover. The three inside pieces are cut with my coluzzle out of Pumpkin Pie Cardstock, the largest possible circle. I stamped randomly with Just Like You, the current RMH stamp set, and used my SAB rub-ons as well. I glued a pumpkin pie flower (from Flower Fusion) on the cover. Everything was stamped in Chocolate Chip.


I hope this inspires you! Have a wonderful Easter.
Stacy Westman
March 14, 2008
Question from a Customer on Tile Stamping:
I love your blog – thank-you for sharing your talents!
I have some questions I hope you might be kind enough to help me with. I am organizing a First Grade Art project where I am planning to decorate the border of a mirror with small (1″ square) tiles.
The tiles are blank and in bisque form (pottery fired once, but not shiny sealed). My plan is to have each class member print their thumbprint on a tile.
My questions are:
1. Do you think this will work?!
2. What ink should I use?
3. Which technique will get the best result? I was planning on painting
the tiles in a white acrylic and then doing the thumbprints in ink and then sealing with a gloss sealer of some kind. Should I use heat setting in the oven at any point?
Any advice you could give would be greatly appreciated!!
Susan
Here’s my answer for Susan. I thought others might want to know this too. When the project is finished she’ll email me photos, and I’ll post them here.
First off, that will definitely work! I think that will look fantastic.
Before you take it to the classroom I’d suggest you try it out at home. I
believe you will have no problem.
I would suggest using a pigment ink, such as the craft ink from Stampin’
Up!. Originally I thought about using Stazon but upon reading that you plan
on the students using their fingers for the stamp I changed my mind. Stazon
is like a Sharpie- has a strong odor, would stain the skin for quite a
while, and I’m not sure I’d want my 4 year old using that on his skin.
Pigment ink is a good ink to use- if you do one child at a time, with a
healthy supply of babywipes on hand to clean their fingers right away-
before they touch their clothes, hair, your clothes, etc. It will probably
stain most clothing even without being heat set so don’t let them on their
own to stamp their fingers unless you have some helpers on hand to make sure
they wipe their fingers before continuing on to another student.
If you have a heat tool that will work to set them- hotter than a hair
dryer. You could also get away with leaving them in a sunny window to “set”
without heating them yourself. I know that the pigment inks won’t fade, and
because you’re not planning to wash the mirror in the washing machine you
shouldn’t need to worry about baking them.
A last step would be to seal them. I like Krylon Crystal Clear but my
husband recently pointed out that it is full of lead…so that’s no longer
my first choice. If you’ve ever used mod podge I’d try that first on your
practice run. 2 or 3 thin coats would be plenty.
That sounds terrific! I’d love to see a picture of your final classroom
project, and with your permission I’d also like to add that photo to my
blog.
Have fun! Enjoy!
February 7, 2008
Technique Tuesday: Sealing Rub Ons
I did take a couple of pictures, but my son and/or husband seem to have moved my USB cable somewhere that I can’t see it, so I’m unable to download the pictures right now. I will get them downloaded as soon as I find the cable.
To seal a vase after applying a rub on I painted a thin line of mod podge over it and just around it. I did 2 layers, making sure the first layer was dry before adding more.
The only downside to using mod podge is that you can see the brush strokes should the light strike it just right. My vase is red and slightly see-through. I think if you did this on a white opaque surface the brush strokes wouldn’t show up as easily.
Now, I ran this under hot water and gently rubbed it, and it didn’t come off, although it takes some time for the mod podge to dry completely after- it tends to get rather tacky. I wouldn’t advise drying with a hand towel while it’s tacky- just let it air dry. I didn’t scrub it or add soap either. I thought in most cases something decorative like a vase, or even a coffee mug, would just get really dirty on the inside, but the outside shouldn’t require more than a rinse.
My massage oil bottle that I used mod podge to seal was run through the dishwasher and it came out just fine- a little on the soft and tacky side while still wet and hot, but once it cooled and air-dryed it was fine.
Enjoy!
December 5, 2007
Technique Tuesday: Tile Coasters, Part 2
This is part 2 of my two-part series on making coasters with tiles.
All of the basic stamping steps are the same as in part 1, but instead of using stazon and watercolour wonder crayons or pastels, you use craft ink.
Start by gathering your supplies, and cleaning your tiles. Make sure you choose a bold image to stamp, not a dainty one, or a line-art image. The craft ink needs to “pop” out at you. Some of the best stamps for this technique are 2-step stamping.

Next, stamp in your colour of choice. I used brocade blue for my first step colour in 2-step stamping.

Heat set your tile before continuing. The brocade blue needs to be dry before adding the top layer of ink. Chocolate chip craft ink was my overstamp colour. I love the contrast between blue and brown, so these two colours together are two of my favorite choices.
As before, to completely finish this project you add cork to the bottom using crystal effects and a few light layers of crystal clear Krylon. However, since it’s very cold tonight outside my house, I’m not going to finish these right now. I’ll wait a few days and hope that the temperature gets to be a bit more seasonal.
So here’s the almost-finished project. I’ll be crafting 2 more of this one and 3 more of my last tutorial to give away as gifts this year.
I hope you enjoyed this, and if you have any questions or comments, or would like to send me a link showing me your projects, I’d be happy to talk to you!

Merry Christmas!
